Hello Lovelies,
today I have a simple sewing project to share with you :0)
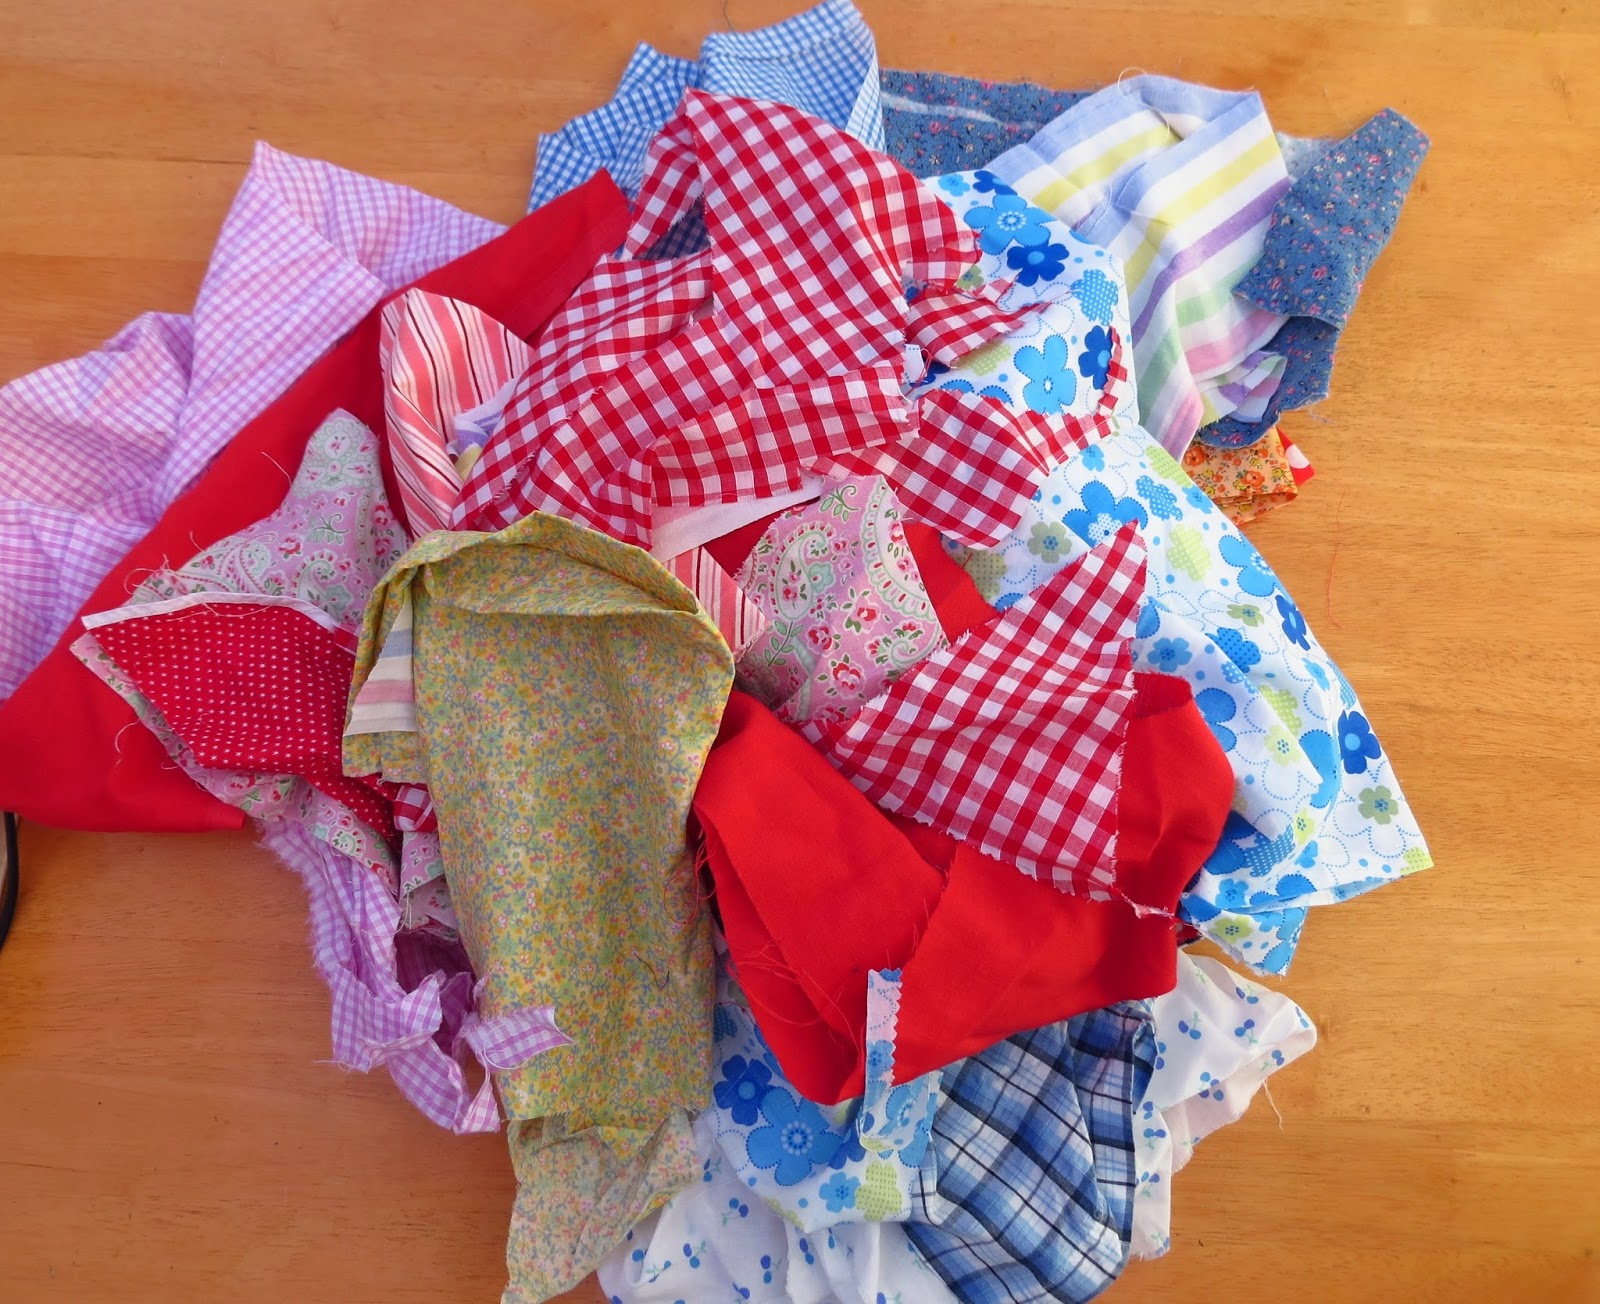
Patchwork was my first crafty love. I adore that you can make something colourful and unique from often uninspiring fabric remnants. I love having a stash of fabric that has gradually grown over many years. Some of the scraps in there date back to my teenage sewing projects or were given to me by my Nana as a child.
Last week I pulled out some appealing colours and patterns.............
Cut out some strips and sewed super easy straight lines.............

This is what I was making.
Ta-Dah...........

A cross body bag..........

It's not a handbag ( though I could do with a new one of those too)
it's a Peg Bag :0)

I love the look of your traditional "hang on the washing line using a coat hanger" type bags but always found them slightly frustrating.
They never seemed to be in the right part of my long washing line no matter how I tried to push them along as I went.
Then I saw THIS post......hurray, Cuckoo had the same problem as me....and she had come up with a brilliant solution.
Now my pegs are always with me as I hang out the washing.
I didn't try and make mine from a pattern...preferring to make it up as I went along. But I took lots of photos of the stages....in case it turned out O.K. and I wanted to share how I did it with you.
Happily It did turnout O.K. In fact I'm rather thrilled with this pretty and super practical make..........

So here's how to make your own version ( which, of course, you can use for any purpose you choose )
Start by cutting out strips of fabric. Mine are varied widths of between 5 and 10 cm. They are all the same length, 32cm
Place two strips right sides together, pin and sew a narrow seam ( you can see mine is just as wide as the presser foot on my machine)

It's O.K. to sew over pins if you place then at right angles to your edge like this
Once you have at least 30cm of width press your piece..........

Then make a second panel in exactly the same way ( you can use the same fabrics again....I used different ones )
I used a steam iron on hot for my cotton fabric and pressed my seams open to make them less bulky......
Watch your fingers!
Next you need to add some interfacing. This makes a huge difference to the look and practicality of the bag so don't be tempted to skip it.
Mine is lightweight, iron-on interfacing. Medium weight would be good for this project too.
Simply cut out two pieces the same size as your patchwork panels, cover with a damp cloth and press. When pressing I turn off the steam on my iron and push firmly down in one place ( for 12 seconds as the instructions say ) before moving along to the next section and repeating.

It's worth taking a bit of time to make sure all your seams are flat and there are no loose threads trapped between the layers before you begin.
This is how your interfacing will look once applied........

Next turn it over and admire :0)
Then make a pattern for your bag. This is simply a 30 x 30cm square of paper. I folded in in half and cut a rounded corner at one edge away from the fold.
Unfold and place on top of your panel.
Pin in place........

Repeat for the second side and then cut a gusset for your bag. The gusset could be omitted if you want to keep things really easy, but it does make a roomier bag that is easy to get your hand into ( something I thought was important for my peg bag project)
The gusset is simply a 90 x 8 cm strip of fabric, which I also applied interfacing to.........

Pin the gusset along three sides of one of your panels, starting at the top edge and easing around the corner. Leave the top open.
I used lots of pins to hold the rounded corner in place, then I took the trouble to tack the seam before sewing. This helps if you are not the most confident sewer
( like me ).
Machine sew a 1cm seam along all 3 sides, taking your time and making sure you haven't trapped extra fabric at the corners.
Finally snip close to the seam on the corners.........

Next attach the second panel to the other side of the gusset and repeat.
Remove any tacking stitches.
There will be a bit of extra length in the gusset that you can remove at this stage.
Make a lining for your bag in exactly the same way as the outer bag ( omitting the patchwork piecing and the interfacing ).
With your outer bag inside out, place it inside your lining ( which is also inside out)
The right sides are together...........

Pin the two layers together, leaving a 15cm gap as you can see here.......

Sew a 1cm seam around the top of your bag........

Remembering to leave that 15cm gap open............

Turn your bag the the right way out and pin the opening closed

.........Before top stitching close to the top of your bag. This will serve two purposes. It will close the gap nicely and give a stiffer top edge to your bag.........

Next you need to make a strap. I used this sweet school uniform dress I found in my stash.......I couldn't remember where it came from till I saw my nieces name inside........

What a cute zip....I need to reuse that sometime too
I cut out 10cm wide strips which I joined together to get a long enough strap.
I folded it in half and sewed a seam along the whole length..........

Next you need to turn your strap the right way out. It's a bit of a fiddle, but with the help of a wooden spoon handle or similar, and lots of shaking/flicking it's not so bad..........

Iron your strap so that the seam is in the centre. Make sure your strap is the length you need , then turn in the ends and sew closed. Next top stitch close to both edges..........

this is the wrong side.
I decided to attach my strap to the inside of my bag, but you could attach it to the outside if you prefer.
Sew a square and add a cross from corner to corner...sewing through all layers of your bag and strap.......

The outside of my bag looks like this............

For a bit of added prettiness I used the rest of the crochet trim bought for THIS project around the top of my bag...........I did this before adding the strap.........

My new wearable peg bag works brilliantly and I love that it contains some sentimental fabrics, like my nieces dress and a checked shirt my that my boys have long since outgrown..........

Do ask if anything is unclear........I'm more than happy to answer questions.
Happy sewing
Jacquie x
What a great idea. My pegs are in a basket that sits on the ground, but it's a pain bending up and down to get them. I've seen peg aprons but this is prettier. xx
ReplyDeleteBrilliant idea and so pretty! You have very pretty fabric scraps too!
ReplyDeleteRachel x
So pretty and practical too! x
ReplyDeleteOh wow that lovely
ReplyDeleteJulie xxxxxxxx
I love this and what a good idea, I have the same problem with my pegs and really it could be used for holding your crochet and knitting projects too. Thank's for the how to. :)
ReplyDeleteWhat a lovely project! this appeals to me on every level - the satisfaction of making the patchwork panels, the memories bound up in the fabric scraps, the practicality of the end result - fabulous! Thank you so much for the tutorial! E x
ReplyDeleteI need to get the sewing machine out. I really need a new peg bag. Thanks for sharing. X
ReplyDeleteThanks a lot for this tuto ! Nice project !
ReplyDeleteThank you. I have got an on line course to try (a birthday present) to learn to sew. I determined to try. This could be a good project - you've got so many pictures for me to follow. Thank you. X
ReplyDeleteThanks for this it must be fate lol, I was just looking at my tatty peg bag yesterday when I was hanging washing out thinking I must get a new one - now I think I'll have a go at making this xx
ReplyDeleteWhat a great idea, thank you for sharing it. I think it will become the latest peg bag fashion!
ReplyDeleteLovely, simple to follow tutorial. I'd love to try this one.
ReplyDeleteI can't sew but looking at your pretty bag, I might need to learn... thanks for the tutorial!
ReplyDeleteTake care,
Anne
http://crochetbetweentwoworlds.blogspot.de
What a fab peg bag. My sister has asked me to make one for her, lazy cat ;0)
ReplyDeleteHugs
What a wonderful idea.
ReplyDeleteThis bag looks great!!! Thanks for the tuto!
ReplyDeleteHave a beautiful day! :o)
Well now I'm one of those who fiddled and faffed to make a lovely hanger style peg bag with an old scrap of vintage curtain fabric - and indeed it looks mighty fine. But practical -nope! It's never where it should be and often slips the wrong way when you're not looking. It's a naughty peg bag! This however is tip of the top - and the fact you made it for next to nothing is great. Must give it a go. Well done Jacquie x Jane
ReplyDeleteThank you for the tutorial. I need to practise on my sewing machine before my next quilt making workshop and this seems like an ideal project. My current coat hanger peg bag is now a bit fally aparty and an across the body one sounds ideal, so perfect timing! x
ReplyDeleteSo very pretty love the lace trim
ReplyDeleteKaren x
Oh that's lovely, you make it look do-able!! I am tempted to try! :-)
ReplyDeleteWonderful idea and great job indeed, I love how it turned out, it really has a country taste to it! : )
ReplyDeleteThe bag is so cheerful...exactly the way fresh laundry is, when hanging on the line.
ReplyDeleteJust brilliant, and I so agree with you about peg bags.
ReplyDeleteluv
irene
xxxx
Fabulous idea, I'm fed up with hunting down pegs in the house. Just the thing to start me off on my machine.
ReplyDeleteThat is my kind of leftover make. I think it is a brilliant idea and I would hang mine up in the house with the aprons using the long handle. I shall be shoe-horning this project in somewhere over the next few months. Love Jo x
ReplyDeleteWhat a brilliant idea, thanks for sharing
ReplyDeleteJackie x
Brilliant idea, hope you don't mind if I borrow it. My peg bag finally 'died' today and that was a blinking nuisance anyway. Another one of those that's never where it needs to be on the washing line, x
ReplyDeleteThanks Jacquie, your bag would be great for all sorts of uses. I think it will spur me on to do something with my scraps :-) The tutorial is so well laid out too. I loved looking at your little pile of remnants trying to spot fabrics I might recognise.
ReplyDeleteTracey xx
Great bag, great tutorial, thanks so much Jacquie - such a good idea to carry it around on your person! Next bag I make will be this style - I've been needing a new peg bag but always find the openings too narrow and troublesome - your bag is perfect! A big tick for you, thank you! xx Joy
ReplyDeleteWhat a sensible peg bag! Like the concept lots. :)
ReplyDeleteIt was just yesterday I was thinking how useless my peg bag was and thought about buying a tin which would have its own problems. Thankyou so much for sharing this fantastic idea!
ReplyDeleteCute!! I'm always attracted to patchwork. Your tutorial helped me. I was stuck on how to sew a "gusset" and strap on a bag my daughter cut out. Tips for interfacing and lining are helpful too. Thanks. Enjoy your cheery peg bag!
ReplyDeleteBlooming LOVE it! Well done you. Now if only the sun would keep his hat on and you'll be ab;e to use it loads. Raining here today. Pfffft.
ReplyDeleteI'm going to be gardening tomorrow. I noticed today your poppies are springing up again. I wonder if mine ever appeared for you in the end. I know they didn't the first year. Oddly, since I've had someone different helping me in my garden occasionally those poppies of mine have vanished from my garden too. I wonder if it's because I used to recognise the little seedlings so didn't weed them away.
xxx
A wonderful peg bag, all the more special with the recycle cloth. I have one of those spinning clothes lines, so the hanging kind doesn't work for me either. I made one from dresses my girls had long since out grown, it's a basket style with a divider in the middle, and I have a tiny table by the line it sets on while I work.(I may have to make a fresh one, following your wearable idea. :)
ReplyDeleteWow, Jacquie, it's wonderful! And it's a very good idea too. I recently saw a pattern for a peg apron which worked on a similar principle. I have one of the coat hanger style peg bags but it always seems to slide down the line away from me when I need it most! Thank you for sharing this pattern with us. x
ReplyDeleteThat's great Jacquie! You've inspired me! I've got a horrible peg bag that spills my pegs everywhere and everytime I use it I think ' Amanda it's time yoy made yourself a peg bag' That's been going on for about 3 years now! Big hugs xxxx
ReplyDeleteJacquie I have been waiting to make this lovely bag for my pegs.. Strangly you posted this just after I had 'remade' my hang-on-the-line bag, which had fallen apart. This has now happened again and I will be making a bag like yours next! Just have to wait for the children to be back at school and then I will have time to pick out my fabric!
ReplyDeleteThank you for all your wonderful projects, pictures and chatter, I do love a good read of what you've been up to :) xxxx